
Many guitarists think faster picking is mainly about moving the hand faster.
In reality, speed often begins with position.
Your picking hand position affects how freely the wrist can move, how deeply the pick enters the strings, how easily you can change strings, how effectively you can mute unwanted noise, and how much tension develops in the fingers, wrist, forearm, and shoulder.
A poor position may still work at slow tempos.
Watch the full video breakdown:
But as soon as you increase the speed, the weaknesses become obvious:
- The pick starts getting trapped
- The wrist becomes stiff
- The forearm begins doing too much work
- String changes become inaccurate
- The pick grip gets tighter
- The hand gradually shifts away from its starting position
During my guitar technique feedback sessions, I often see players trying to solve these problems by adding more force. They squeeze the pick harder, press the palm into the bridge, or use more forearm movement.
This may create a temporary feeling of stability, but it usually makes the technique less efficient.
A good picking hand position should provide two things at the same time:
Stability and freedom of movement.
Your hand needs enough contact with the guitar to know where the strings are, but not so much pressure that the wrist becomes locked.
This article explains how to find that balance.
Quick Answer: Where Should Your Picking Hand Be?
For many electric guitar techniques, a good starting position is:
- Forearm resting naturally against the guitar body
- Shoulder relaxed
- Side of the palm making light contact near the bridge
- Wrist free to move
- Pick held securely without excessive pressure
- Only a small part of the pick passing through the string
- Hand able to move slightly as you travel across the strings
The hand should rest, not push.
It should feel stable without being anchored so firmly that the wrist loses mobility.
There is no single position that every guitarist must copy exactly. Guitar shape, hand size, bridge design, pick grip, and playing style all matter.
The goal is to find a position that allows clean, repeatable movement with minimal unnecessary tension.
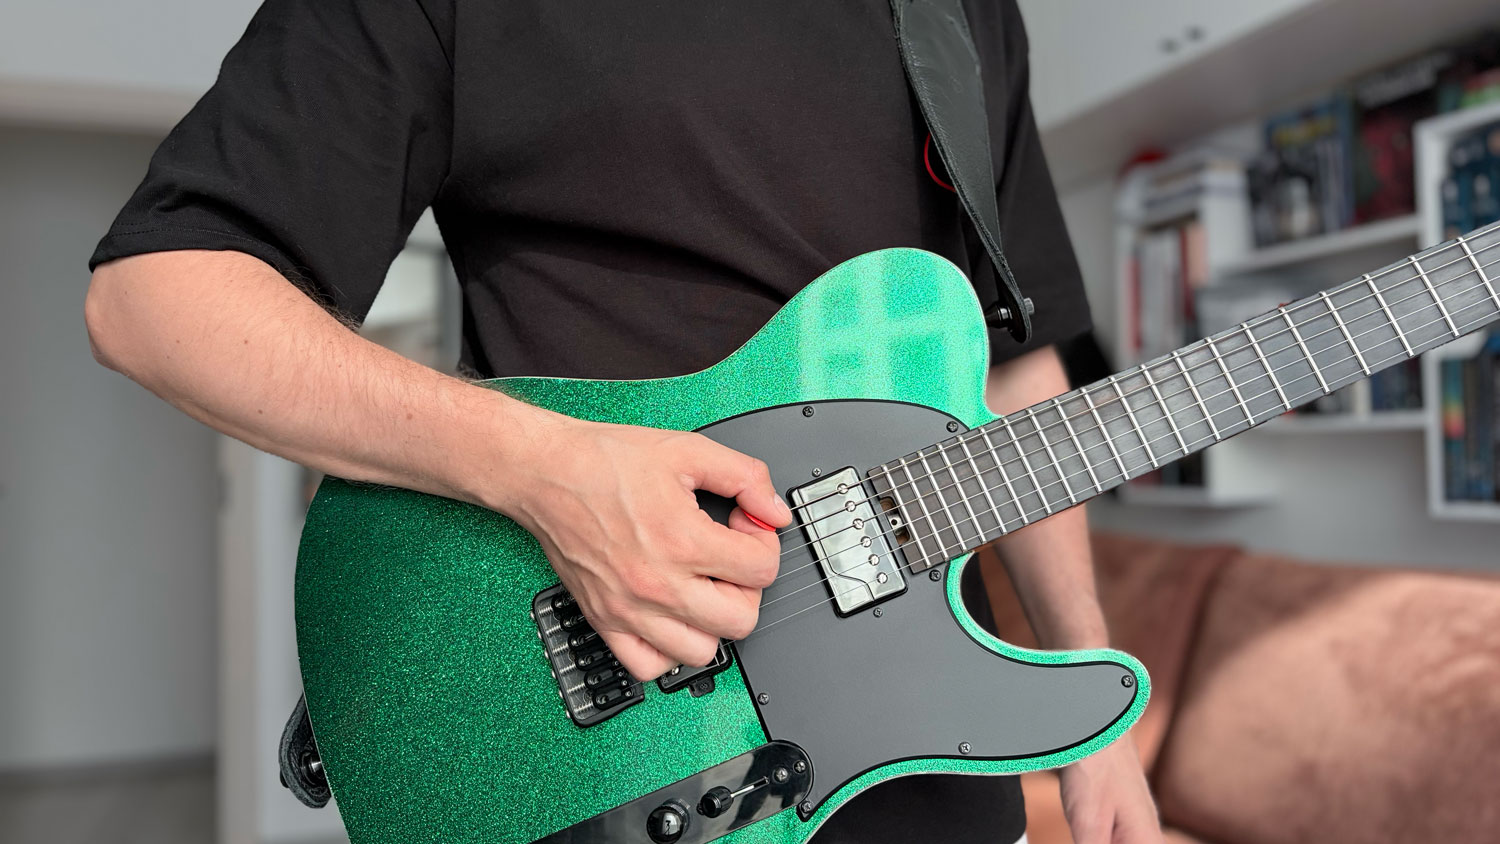
Table of Contents
In this guide
- Why Picking Hand Position Matters
- Where Should the Picking Hand Rest?
- Palm Contact and Palm Muting
- Wrist, Forearm and Pick Grip
- Pick Angle, Pick Depth and Anchoring
- Forearm Position and Guitar Height
- Tracking the Picking Hand Across the Strings
- Common Picking Hand Position Mistakes
- Picking Hand Exercises
- Practicing With a Metronome
- Rhythm vs Lead Guitar Position
- 12-Minute Picking Hand Routine
- Frequently Asked Questions
Why Picking Hand Position Matters

Your picking hand controls much more than simply hitting the strings.
It affects:
- Timing
- Articulation
- Dynamics
- Alternate picking
- String crossing
- Palm muting
- Unwanted string noise
- Pick attack
- Rhythm
- Speed
Small changes in palm pressure, wrist angle, forearm position, or pick grip can change the entire movement.
For example, pressing the palm too heavily into the bridge may make the hand feel secure but restrict the wrist.
Holding the hand too far away from the strings may create freedom, but string targeting becomes less predictable.
A good position allows you to reach all six strings without completely rebuilding the hand position every time.
Stability Does Not Mean Pressure
One of the most common mistakes I see is confusing stability with force.
A guitarist wants the picking hand to feel controlled, so the palm is pressed firmly into the bridge or strings. The forearm may also push into the body of the guitar.
The hand feels fixed.
But the wrist is no longer free.
This often causes the player to compensate by using more elbow or forearm movement.
True picking-hand stability should come from light reference points and consistent positioning, not from force.
Think about writing with a pen.
You need contact with the paper, but pressing the pen as hard as possible does not improve your control.
The same principle applies to guitar.
Use enough contact to know where you are, but not enough to restrict the movement.
Where Should the Picking Hand Rest?
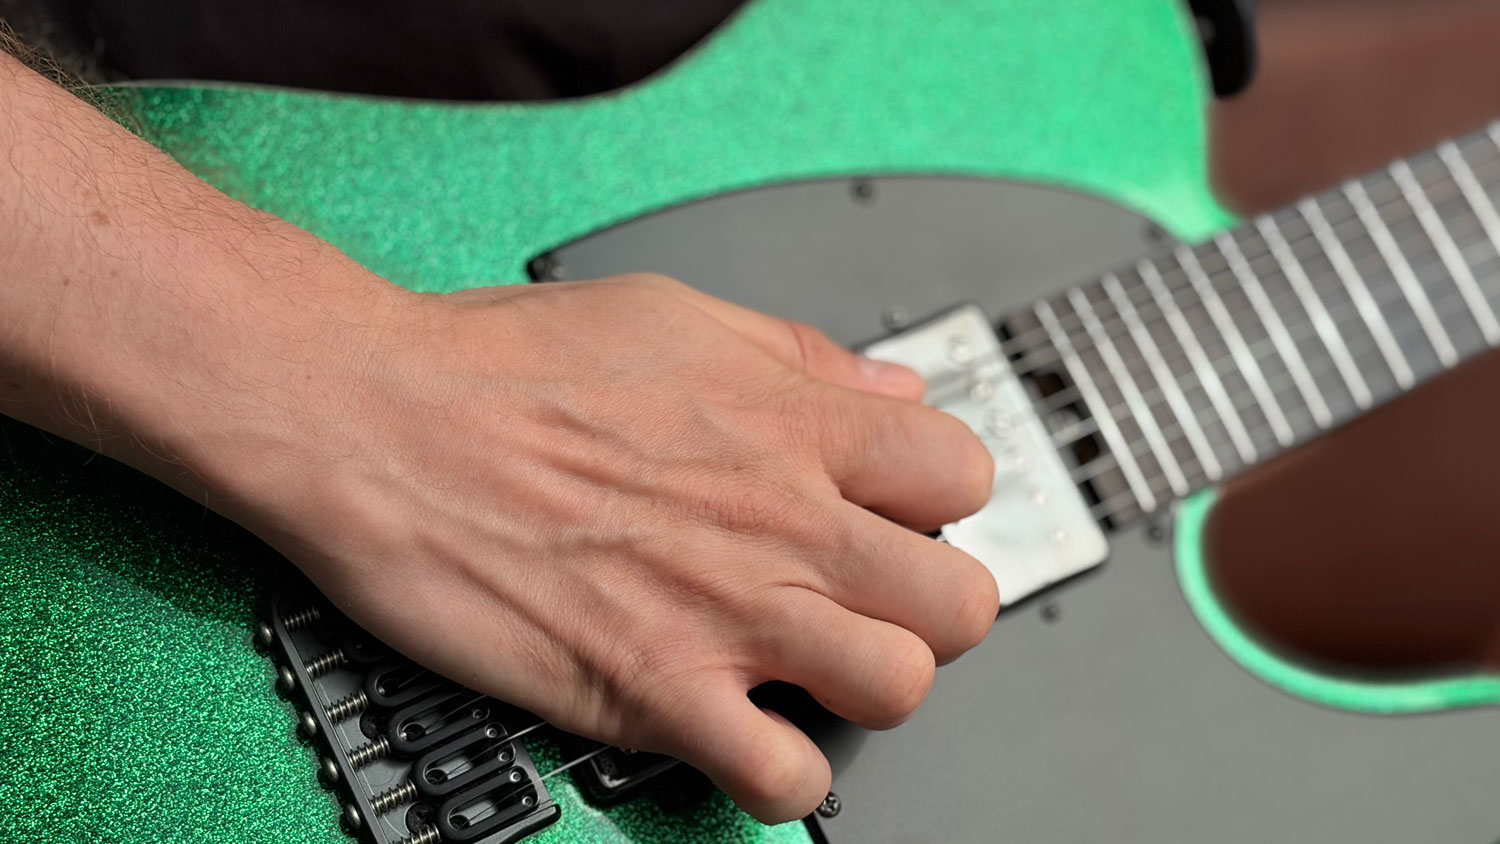
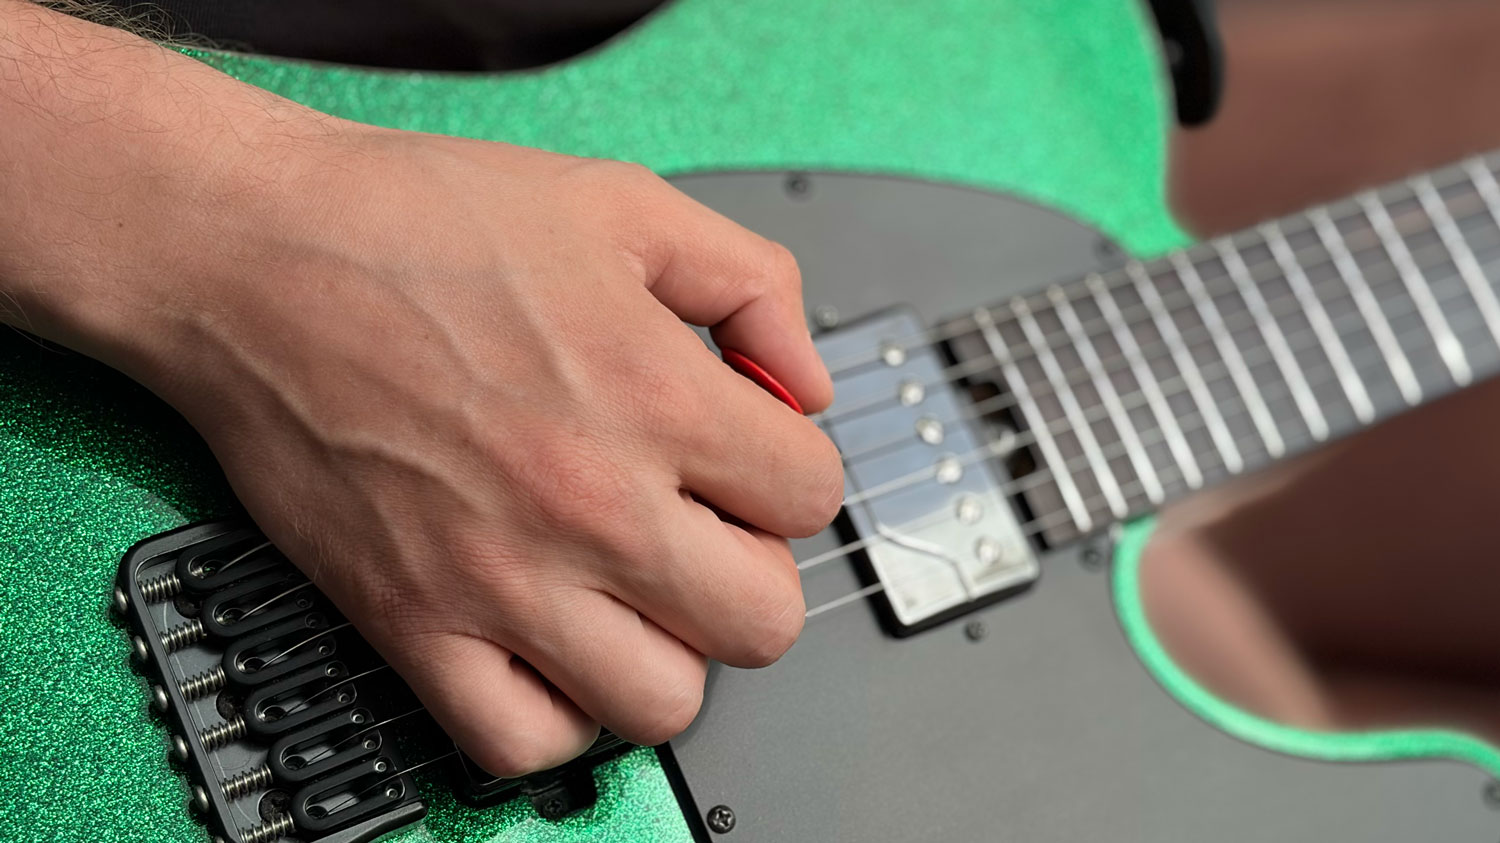
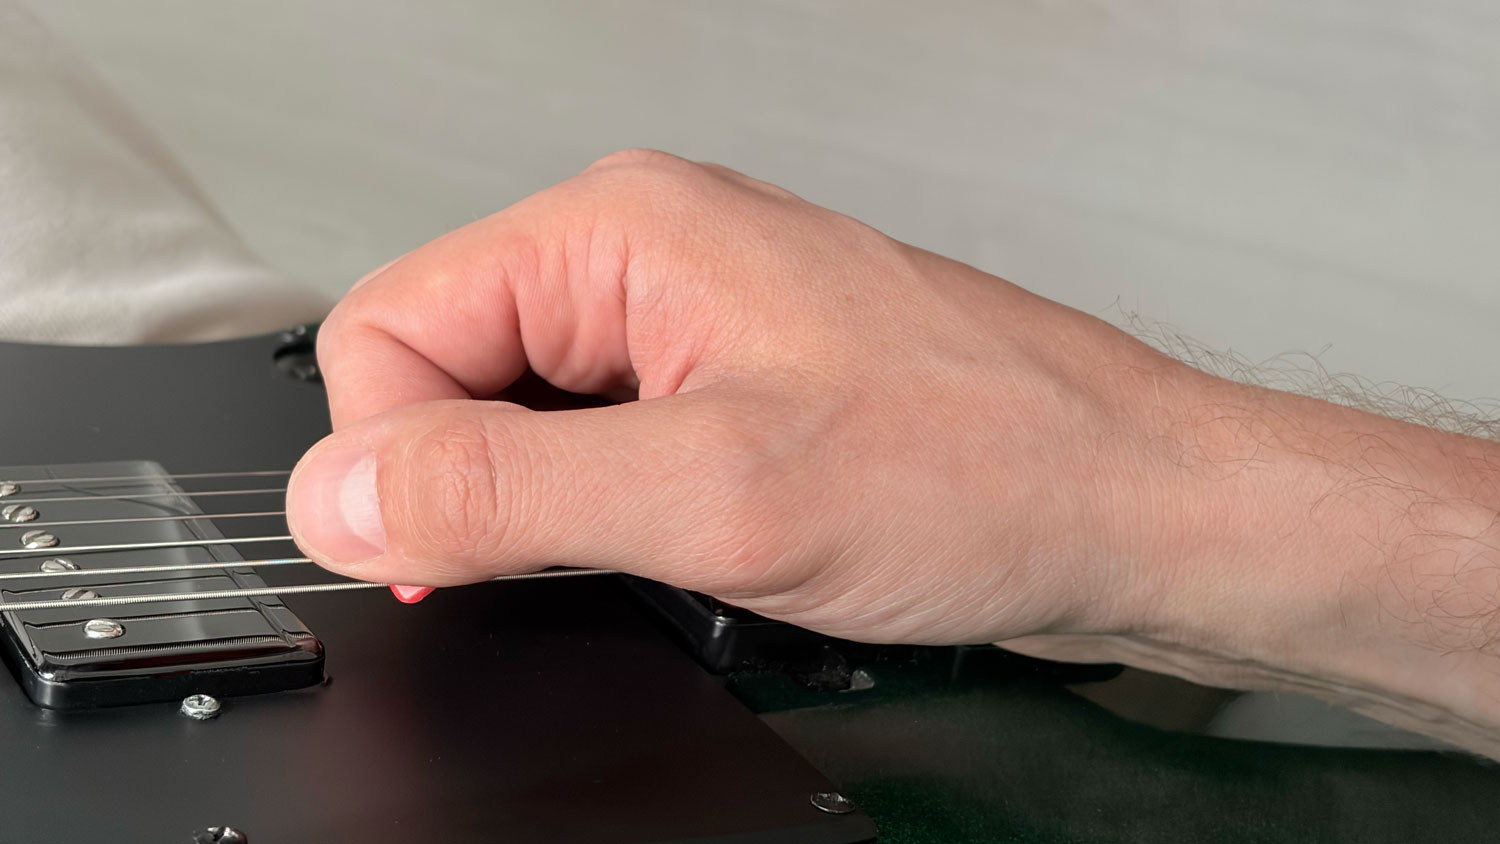
For many electric guitar techniques, the side of the picking hand can rest lightly near the bridge.
This provides a useful reference point and helps with muting.
A good starting setup is:
- Relax the shoulder.
- Let the forearm rest naturally against the guitar body.
- Allow the hand to fall toward the bridge.
- Place the side of the palm lightly near the bridge saddles.
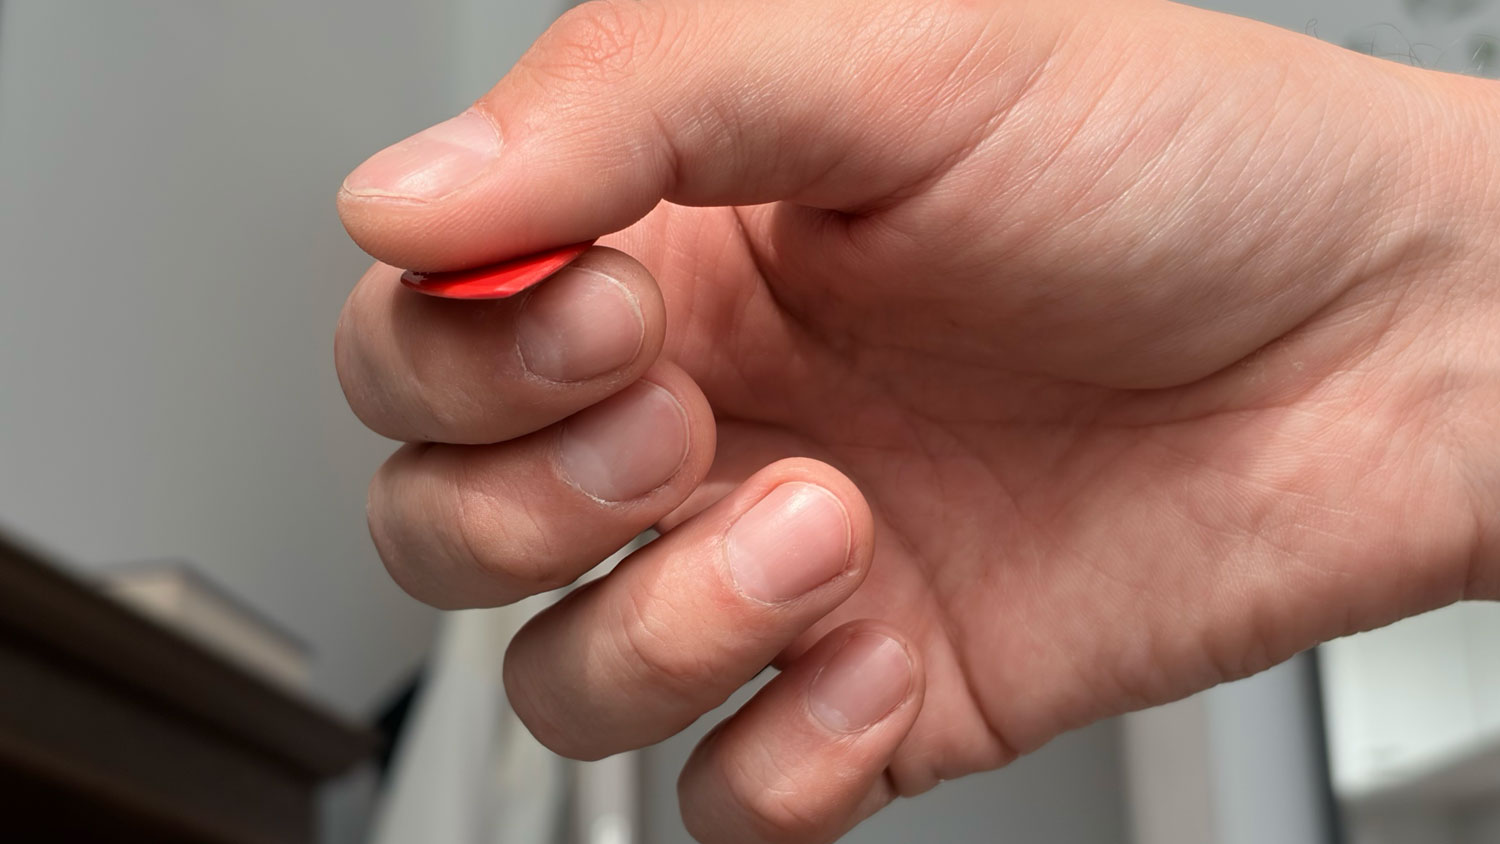
- Hold the pick between the thumb and index finger.
- Let only a small part of the pick contact the string.
- Check that the wrist can move freely in both directions.
Do not force the hand into a position because it looks correct in a photograph.
The position should feel natural and allow the movement you need.
Should Your Palm Rest on the Bridge?
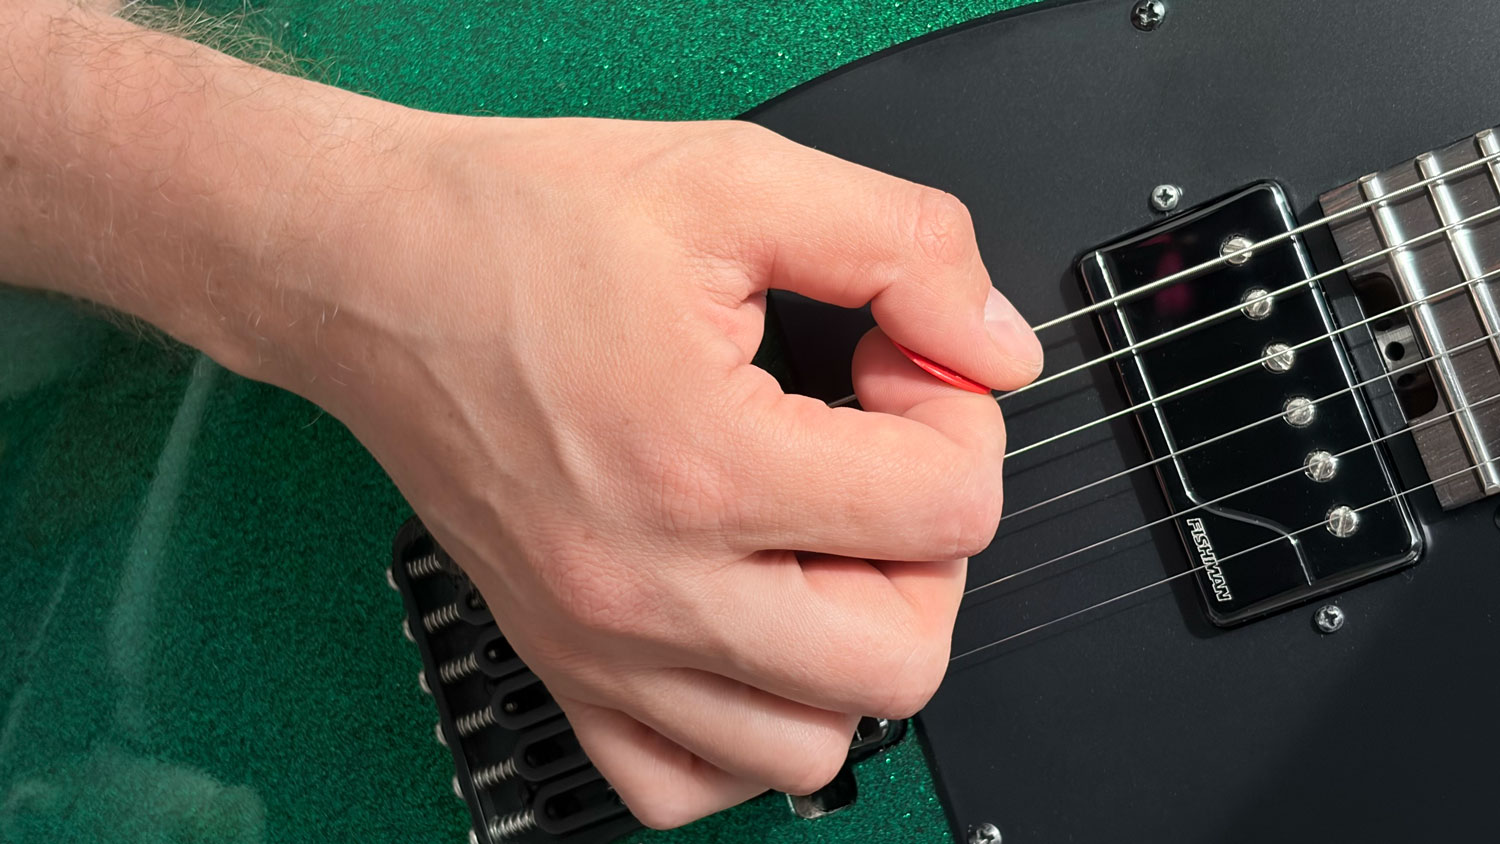
Light bridge contact can be very useful.
It can improve:
- Stability
- String awareness
- Palm muting
- Unwanted-string control
- Picking consistency
But the important word is light.
The hand should rest on or near the bridge rather than pressing downward.
Too much pressure can:
- Lock the wrist
- Increase pick depth
- Create forearm tension
- Reduce string-crossing freedom
- Affect the pitch on some floating bridge systems
If you use a tremolo or floating bridge, this is especially important because heavy palm pressure may slightly change the pitch.
The exact contact point will change depending on whether you are playing open notes, palm-muted rhythm, or lead guitar.
Palm Muting and Picking Hand Position
Palm muting requires a small adjustment rather than a completely different hand position.
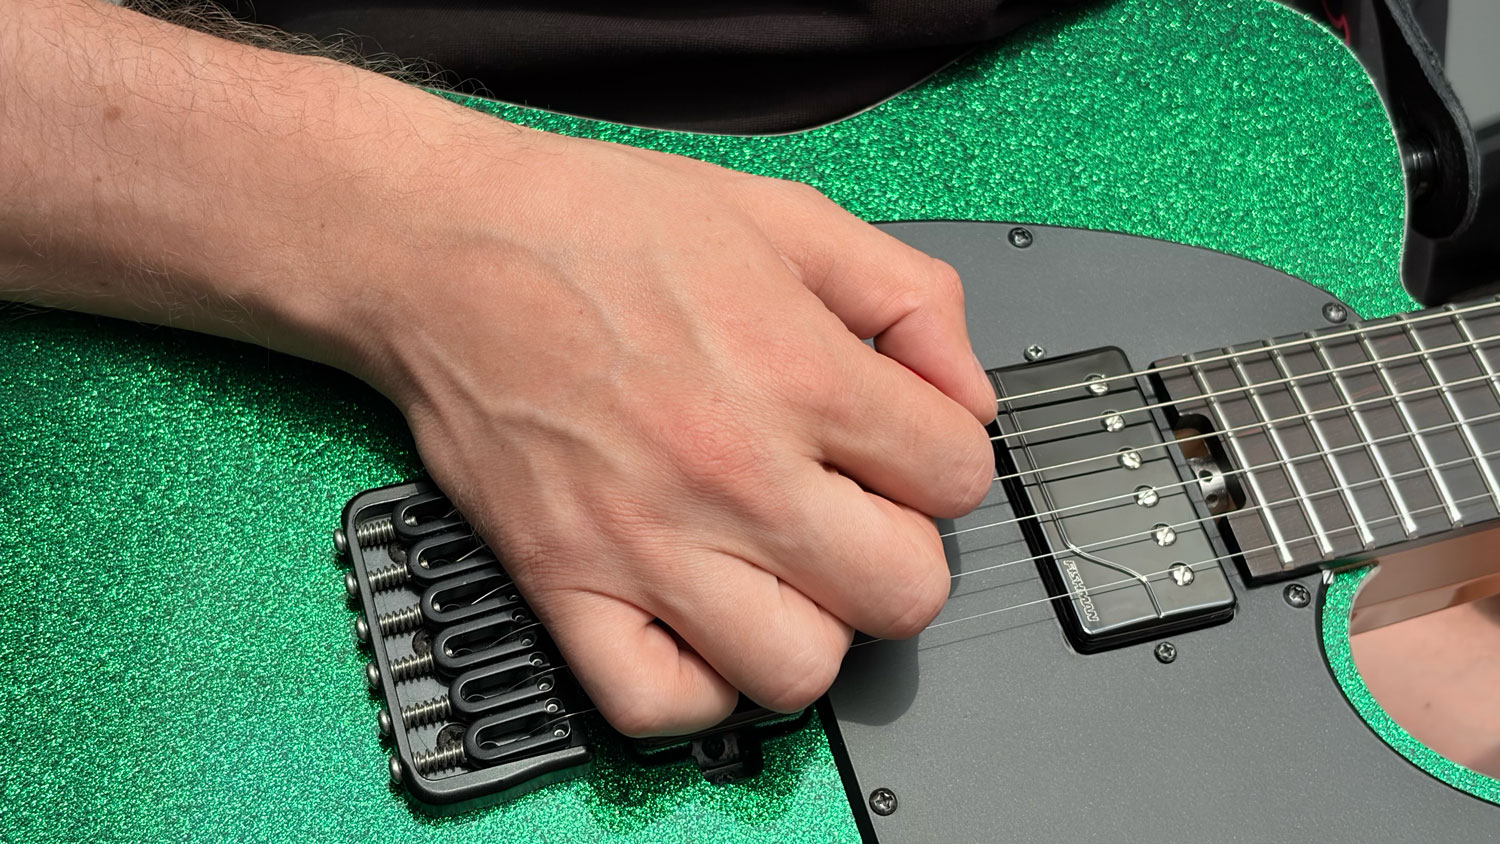
Place the side of the palm close to the bridge saddles.
If the hand moves too far toward the neck, the strings become overly muted and lose definition.
If it moves too far behind the bridge, the muting becomes weak.
The useful area is usually somewhere close to the point where the string meets the bridge.
Experiment until you find a balance between:
- Clear pitch
- Tight attack
- Controlled sustain
- Consistent rhythm
Palm muting is not simply ON or OFF.
Very small changes in hand position can create different levels of muting.
Exercise: Open Notes to Palm Muting
Choose one low string.
Play:
4 open notes → 4 palm-muted notes
Use alternate picking.
Move the palm only as much as necessary to change the sound.
Avoid lifting the entire hand or arm between the two positions.
This develops control over the contact point without rebuilding the picking position.
Should the Wrist Be Straight?
Not necessarily.
The wrist does not need to be perfectly straight.
A slight natural bend is common and can be completely comfortable.
The important question is whether the wrist remains free.
Ask yourself:
- Can I move the pick without forcing the wrist?
- Does the wrist feel compressed?
- Does my forearm become rigid?
- Does my hand position change when I increase the tempo?
- Can I reach all six strings without an extreme wrist angle?
If the wrist feels locked, the problem may not actually be the wrist.
Your forearm position, guitar height, palm pressure, or strap height may be forcing it into an inefficient angle.
Make small adjustments before trying to force a different wrist position.
Wrist Movement vs Forearm Movement
For many alternate picking situations, a compact wrist movement is an efficient primary motion.
The forearm does not need to remain frozen. It may:
- Reposition the hand
- Follow different string groups
- Adjust palm muting
- Rotate slightly
- Support accents
But if the wrist becomes rigid and the entire forearm or elbow drives every stroke, the movement often becomes larger and more tiring.
Common warning signs include:
- Elbow moving on every note
- Shoulder rising
- Forearm becoming tired quickly
- Picking motion growing as the tempo increases
- Difficulty controlling individual strings
This subject deserves its own detailed explanation, so rather than repeating it here:
Read: Wrist vs Forearm Picking: Which Movement Should You Use?
How Tight Should You Hold the Pick?
Pick-grip pressure directly affects the rest of the picking hand.
Too loose:
- The pick rotates
- The attack becomes unstable
- The pick may move in your fingers
Too tight:
- The thumb becomes rigid
- The wrist loses mobility
- The forearm becomes tense
- The attack becomes heavy
- The pick may feel trapped by the string
Use enough pressure to keep the pick stable, but no more.
Exercise: Minimum Grip Pressure
Play slow alternate strokes on one muted string.
Start with an intentionally tight grip.
Gradually release pressure until the pick almost begins to move.
Then add just enough pressure to regain control.
That gives you a useful reference for the minimum grip force required.
Repeat the test at higher tempos.
Many players automatically squeeze harder as soon as they try to play faster.
Pick Angle and Hand Position
A slight pick angle can reduce resistance when the pick crosses the string.
If the broad flat surface of the pick meets the string completely square, the resistance may feel stronger.
Tilting the pick slightly allows the edge to slide through the string more easily.
But excessive angle can create:
- Too much scraping noise
- Thin tone
- Reduced articulation
- Unstable attack
Your pick angle should come naturally from the complete hand position.
Do not aggressively twist the thumb just to create an angle.
The position of the:
- Wrist
- Thumb
- Index finger
- Forearm
- Palm
should work together.
Pick Depth and Picking Hand Position
Your picking hand position strongly affects how deeply the pick enters the strings.
If the hand sits too close to the strings, the pick tends to dig deeper.
If the hand is too far away, the attack may become inconsistent.
For fast picking, you generally want enough contact for a clear note without unnecessary resistance.
If you frequently feel that the pick is getting stuck, the problem may not only be how much of the pick is exposed.
The entire hand may be sitting too close to the strings.
Because pick depth is such an important subject, I cover it separately here:
Read: How Deep Should the Pick Go Between the Strings?
Should You Anchor Your Fingers?
Some guitarists place one or more fingers on the guitar body while picking.
This can provide a useful reference point.
Anchoring is not automatically wrong.
The issue is how much pressure you use.
Heavy anchoring can:
- Restrict wrist movement
- Increase hand tension
- Make string changes harder
- Pull the hand into an unnatural position
Light finger contact may be completely comfortable.
Exercise: Anchoring Test
Play a simple one-string alternate picking pattern using your normal finger contact.
Then play the same pattern with the fingers slightly lifted.
Compare:
- Wrist freedom
- Accuracy
- Pick depth
- Tension
- String crossing
The correct choice is the one that gives you stability without restricting the hand.
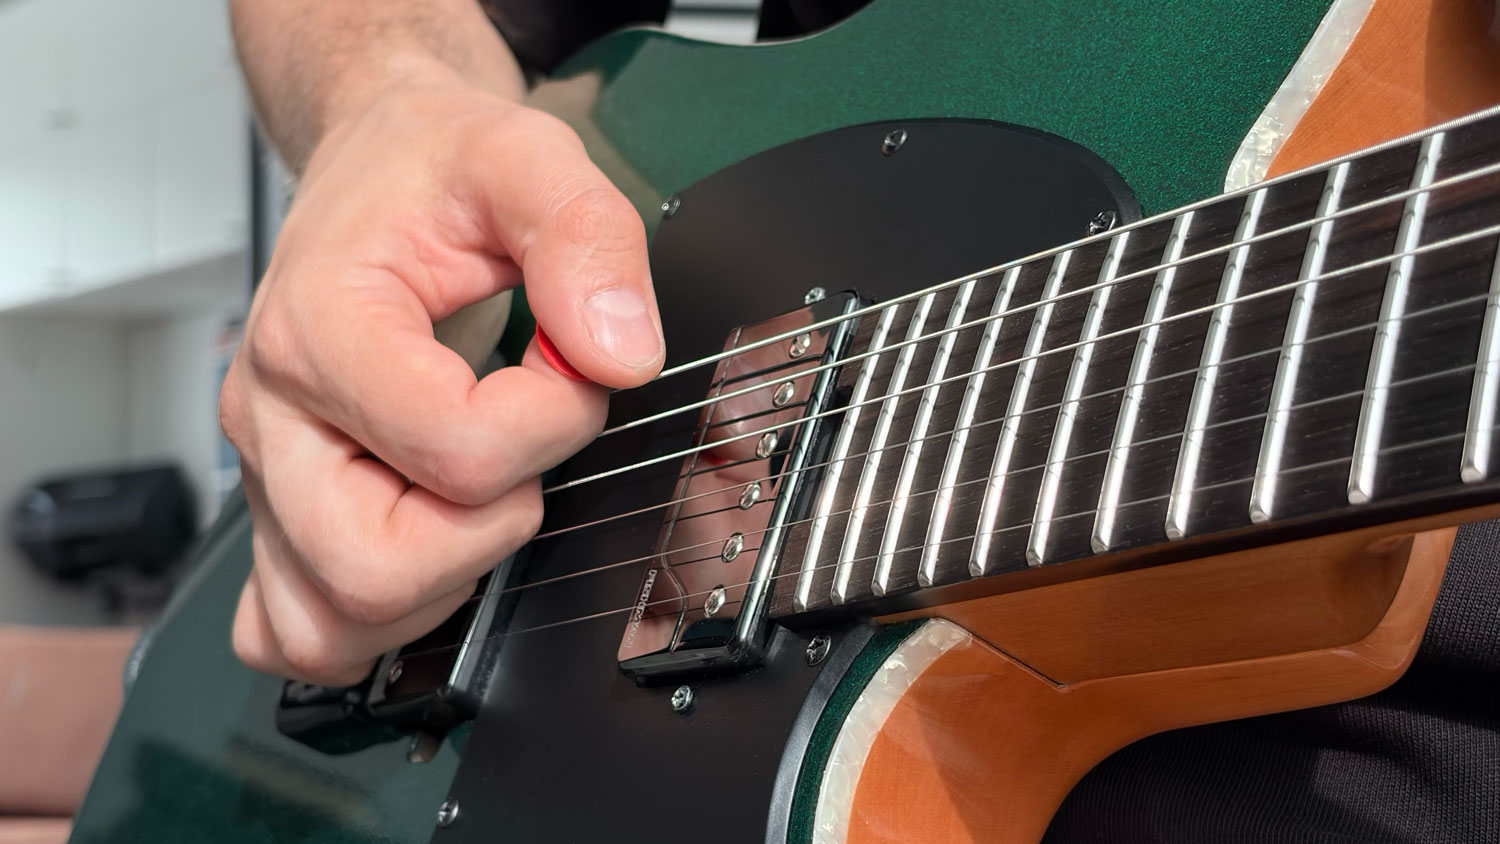
Forearm Contact With the Guitar
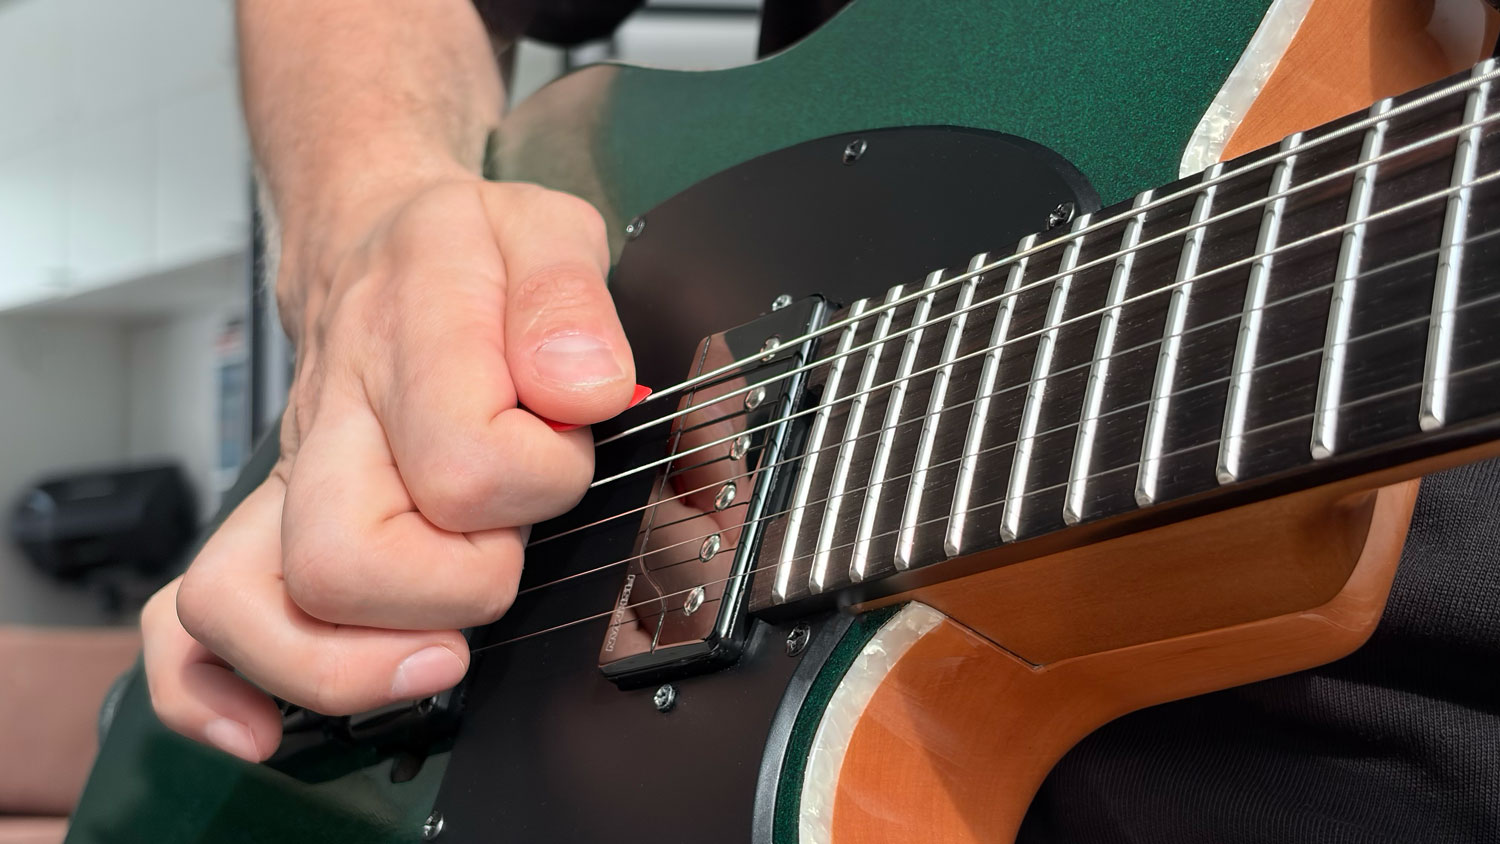
The forearm normally rests against the body of the guitar.
This supports the arm, but the contact point can influence the entire picking position.
If you press heavily into the guitar body, the hand may become rigid.
If the forearm is positioned too far forward or backward, the wrist may be forced into an uncomfortable angle.
Try small adjustments:
- Move the forearm slightly forward
- Move it slightly backward
- Raise or lower the guitar
- Change the neck angle
- Adjust the strap
Then play the same simple picking pattern.
The ideal position is the one that allows the wrist and hand to move with less effort.
Sometimes a picking-hand problem actually starts with the position of the entire guitar.
Guitar Height Matters
The height of the guitar affects:
- Shoulder position
- Elbow angle
- Forearm contact
- Wrist angle
- Bridge access
If the guitar hangs extremely low, the picking arm may have to reach downward and the wrist may bend more.
If it sits too high, the shoulder or elbow may feel compressed.
There is no universal strap height.
But your playing position should allow:
- Relaxed shoulders
- Comfortable bridge access
- Free wrist movement
- Stable picking
- Similar mechanics while sitting and standing
A useful test is to compare yourself sitting and standing.
If your picking technique changes dramatically when you stand up, the guitar position may be part of the problem.
Your Picking Hand Should Track Across the Strings
A common mistake is trying to keep the picking hand completely fixed while reaching all six strings.
This often forces the wrist into increasingly awkward positions.
Instead, allow the hand to make small tracking movements as you move from the low strings to the high strings.
The position should remain generally stable, but not frozen.
Exercise: Six-String Tracking
Mute all six strings with the fretting hand.
Play two alternate strokes per string:
Low E → A → D → G → B → High E
Then return.
Maintain:
- Similar pick depth
- Similar stroke size
- Similar volume
- Relaxed wrist
- Light palm contact
Notice whether the hand naturally shifts slightly with the string group.
This is good.
You do not need to force all six strings from exactly the same fixed point.
Picking Hand Position and Alternate Picking
Poor hand position often creates the same problems that appear in alternate picking:
- Uneven downstrokes and upstrokes
- Excessive tension
- Deep pick contact
- Large movements
- Difficult string changes
- Loss of synchronization
Before trying to increase your alternate picking speed, make sure the hand is positioned in a way that allows the wrist and pick to move freely.
For the complete guide:
Read: 7 Common Alternate Picking Mistakes and How to Fix Them
Picking Hand Position and Hand Synchronization
Hand synchronization can also be affected by the picking position.
If the hand gradually changes position as you increase the tempo:
- The pick depth changes
- The attack becomes inconsistent
- String changes take longer
- The picking hand may rush or fall behind
- The fretting hand no longer matches each attack
A synchronization problem can therefore begin with a positional problem.
If your playing is clean slowly but falls apart at higher speeds:
Read: Why Your Hands Lose Synchronization at Higher Speeds
Quick Diagnostic: 8 Picking Hand Position Mistakes
1. Pressing Too Hard Into the Bridge
This creates stability through force and restricts the wrist.
Correction: Reduce palm pressure while maintaining light contact.
2. Resting Too Far Forward on the Strings
The notes become overly muted.
Correction: Move the contact point slightly closer to the bridge.
3. Floating Too Far Above the Guitar
The hand loses its reference point and string targeting becomes less predictable.
Correction: Experiment with light bridge or string contact.
4. Locking the Wrist
The forearm or elbow begins driving the movement.
Correction: Reduce the tempo and rebuild a compact wrist motion.
5. Holding the Pick Too Tightly
Tension spreads into the wrist and forearm.
Correction: Use only enough pressure to stabilize the pick.
6. Using Too Much Pick Depth
The string creates unnecessary resistance.
Correction: Reduce the depth and check whether the entire hand sits too close to the strings.
7. Keeping the Hand Completely Fixed
The wrist is forced into awkward angles when changing strings.
Correction: Allow small tracking movements.
8. Changing Position at Higher Speeds
The slow technique and fast technique become two different movements.
Correction: Record yourself at several tempos and identify the first positional change.
Exercise 1: Position Reset Drill
Choose a short four-note pattern.
Before each repetition:
- Relax your shoulder.
- Let the forearm rest naturally.
- Place the palm lightly near the bridge.
- Check the wrist.
- Check the pick depth.
- Play one clean repetition.
- Stop and reset.
This helps you develop a repeatable starting position.
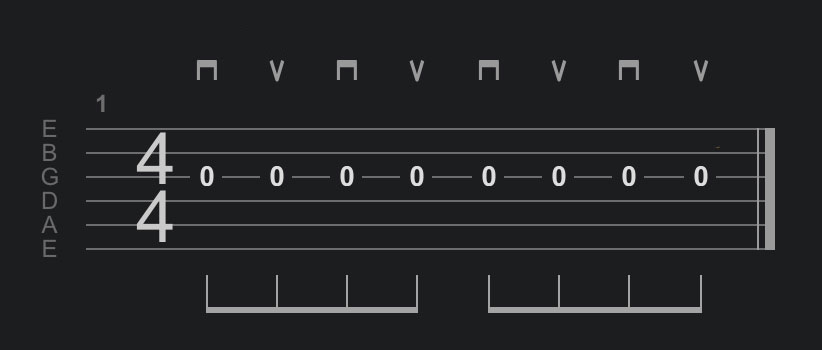
Exercise 2: Palm Pressure Comparison
Play the same short alternate picking phrase three ways:
Version 1
Press heavily into the bridge.
Version 2
Remove almost all contact.
Version 3
Use light controlled contact.
Compare:
- Wrist freedom
- Accuracy
- Tone
- Tension
- Pick depth
The third position should give you enough stability without locking the hand.
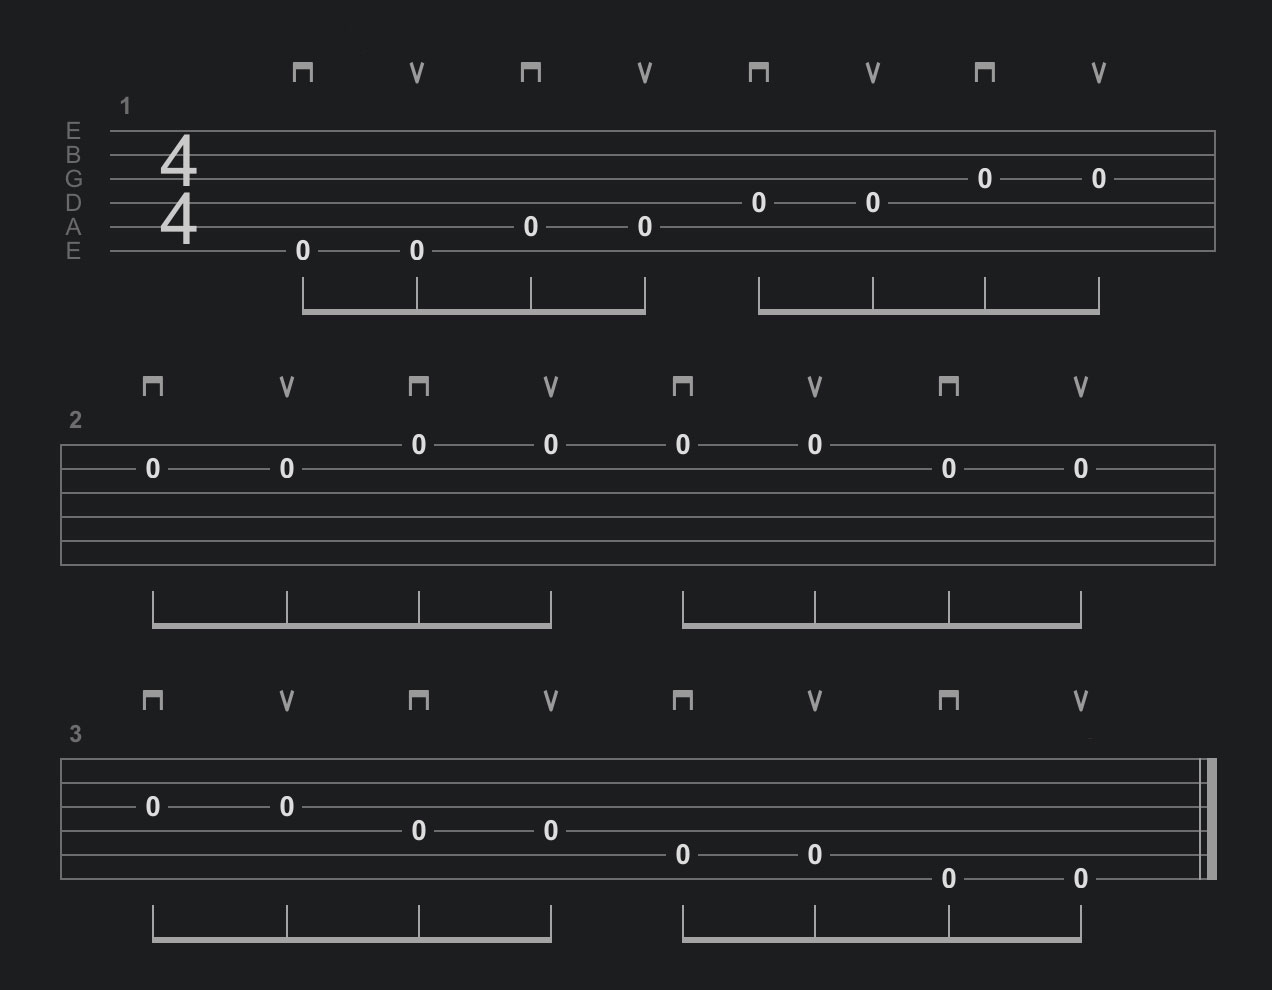
Exercise 3: Six-String Position Control
Play two muted strokes on each string.
Move across all six strings and back.
Watch whether:
- Pick depth changes
- Palm pressure increases
- Wrist angle becomes extreme
- Forearm tension appears
- Volume changes
Keep the movement slow enough to observe the position.
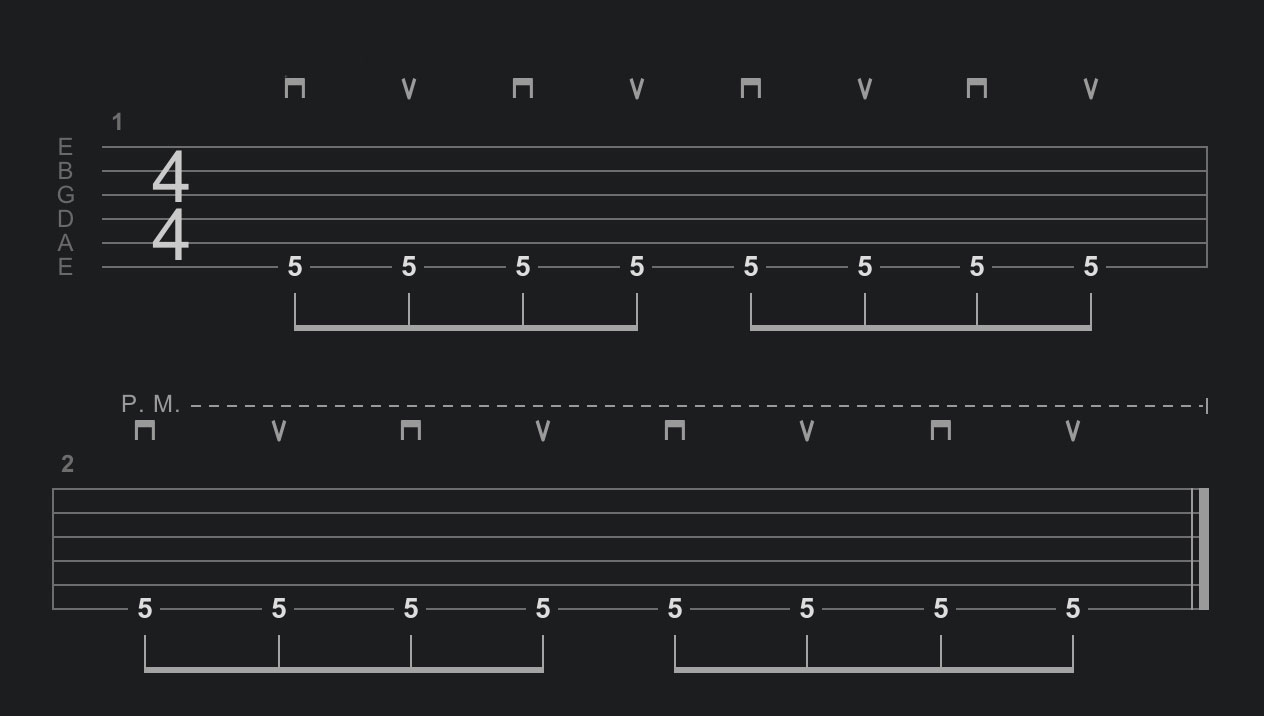
Exercise 4: Open to Palm-Muted Notes
Play:
8 open notes → 8 palm-muted notes
on the same string.
Use only a small movement of the palm.
The wrist and pick grip should remain almost unchanged.
Exercise 5: Short Speed Bursts
Choose one simple pattern.
Play four fast notes, then stop.
During the pause, check your hand position.
Repeat:
4 notes → rest → 4 notes → rest
When the position remains stable, increase the burst to six or eight notes.
This reveals whether your hand changes when the tempo increases.
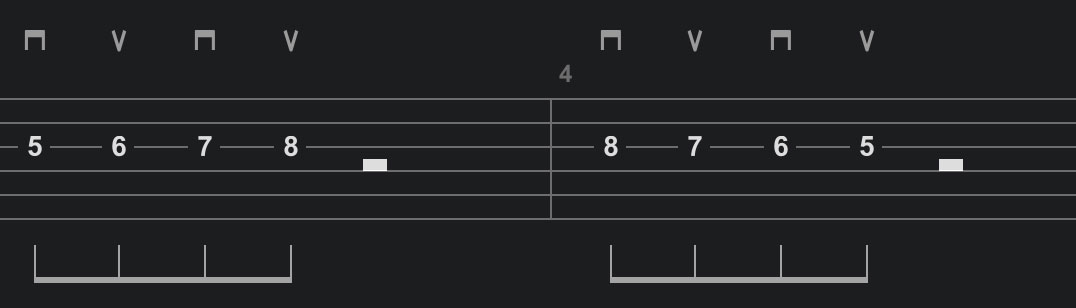
If your picking-hand position stays stable during short bursts, the next step is to gradually extend that speed. My free Guitar Speed Builder gives you a structured workout for doing exactly that.
Exercise 6: Tension Scale
Rate your picking-hand tension from 1 to 10.
At a comfortable tempo, try to stay around 2–3.
Increase the tempo slightly.
If tension rises sharply, stop.
Ask what changed:
- Grip?
- Wrist?
- Palm pressure?
- Forearm?
- Shoulder?
- Pick depth?
This teaches you to recognize tension before the technique completely breaks down.
How to Practice Picking Hand Position With a Metronome
Do not use the metronome only to measure your highest BPM.
Use it to observe whether your position remains consistent.
Start at a comfortable tempo.
Play several clean repetitions.
Increase by approximately 2–5 BPM.
At each tempo, check:
- Is the wrist still free?
- Is the palm pressing harder?
- Is the grip becoming tighter?
- Is the motion becoming larger?
- Is the pick entering more deeply?
- Is the elbow starting to move?
- Is the hand shifting away from the bridge?
Your useful technical limit is not the fastest tempo where you can somehow play all the notes.
It is the fastest tempo where your technique remains controlled and repeatable.
How to Record Your Picking Hand
Video is one of the best ways to analyze hand position.
Record the same exercise from several angles.
Player’s Perspective
Useful for:
- String tracking
- Pick direction
- Pick exposure
- Palm location
Front View
Useful for:
- Wrist movement
- Finger anchoring
- Forearm and elbow movement
- Grip tension
Side View Near the Bridge
Useful for:
- Palm pressure
- Pick depth
- Pick angle
- Wrist height
Record at three speeds:
- Comfortable
- Medium
- The first tempo where the movement becomes difficult
The goal is to identify the first change, not only the final mistake.
Picking Hand Position for Rhythm Guitar
Rhythm guitar often requires:
- Stronger articulation
- Palm muting
- Repeated downstrokes
- Fast alternate-picked riffs
The movement may be slightly larger than during fast lead playing, but it should remain controlled.
For tight rhythm guitar:
- Keep the palm close to the bridge
- Avoid excessive downward pressure
- Use a stable but relaxed pick grip
- Let the wrist provide most of the repeated motion
- Reduce movement size as the tempo increases
- Keep the shoulder relaxed
A heavy sound does not require a heavy, tense movement.
Picking Hand Position for Lead Guitar
Lead guitar often requires more freedom because the pick must move accurately between strings.
For lead playing:
- Keep palm contact light
- Maintain shallow pick depth
- Allow small tracking movements
- Keep the wrist mobile
- Avoid changing your grip during difficult passages
- Use both downstrokes and upstrokes consistently
The hand does not need to float completely above the guitar.
A light reference point can still improve control.
Picking Hand Position and String Noise
A stable hand position also helps with muting.
When playing higher strings, the side of the picking hand can help mute lower strings that are not being used.
The fretting hand can control higher strings and unwanted releases.
Both hands should work together.
Do not try to eliminate every unwanted sound by pressing harder with the picking hand.
Use the minimum pressure required.
A Focused 12-Minute Picking Hand Routine
1. Position Reset — 2 Minutes
Set the forearm, palm, wrist, and pick before every repetition.
2. Relaxed One-String Picking — 2 Minutes
Focus on light contact and free wrist movement.
3. Open to Palm Muting — 2 Minutes
Practice small palm-position adjustments.
4. Six-String Tracking — 2 Minutes
Move across all strings without freezing the hand.
5. Two-String Alternate Picking — 2 Minutes
Maintain the position during string changes.
6. Speed Bursts — 2 Minutes
Test whether the hand stays stable at faster speeds.
The routine should prepare the hand, not exhaust it.
How Long Does It Take to Change Your Picking Hand Position?
A more efficient position can feel strange at first.
Even an inefficient technique feels natural after thousands of repetitions.
Do not expect a new position to feel automatic immediately.
A useful change should gradually produce:
- Less tension
- Better endurance
- Easier string changes
- More stable pick depth
- Cleaner articulation
- More consistent timing
Practice the new position in short focused sessions.
Do not force the hand into a rigid pose for long periods.
If a position creates pain, numbness, tingling, or persistent discomfort, stop and do not try to push through it.
Frequently Asked Questions About Picking Hand Position
Where should I place my picking hand on the guitar?
For many electric guitar techniques, the side of the palm can rest lightly near the bridge. The exact contact point changes depending on palm muting, rhythm playing, and lead playing.
Should my picking hand rest on the bridge?
Light contact can improve stability and muting. Heavy pressure may restrict the wrist and, on some floating bridge systems, affect pitch.
Should my wrist be straight?
It does not need to be perfectly straight. A slight natural bend is fine if the wrist remains comfortable and free to move.
Should I pick from the wrist or forearm?
For many alternate picking situations, the wrist can provide the main repeated motion while the forearm supports positioning and string tracking.
How tightly should I hold the pick?
Use enough pressure to keep it stable, but avoid squeezing harder than necessary.
Should I anchor my fingers?
Light finger contact can be useful. Heavy anchoring may restrict wrist movement and string changes.
Why does my picking hand become tense when I play faster?
You may be tightening the pick grip, pressing harder into the bridge, increasing movement size, or allowing the wrist to lock.
Why does my pick get stuck?
Common causes include excessive pick depth, a tight grip, large movement, and a hand position that places the pick too deeply between the strings.
Should the picking hand move when changing strings?
Yes. Small tracking movements can help maintain a consistent wrist position and pick depth across all six strings.
Can picking hand position limit speed?
Yes. Poor positioning can create tension, excessive pick depth, large movements, inconsistent string crossing, and synchronization problems.
Related Guitar Technique Guides
7 Common Alternate Picking Mistakes and How to Fix Them
Learn how tension, weak upstrokes, string crossing, pick depth, and synchronization limit alternate picking speed.
Wrist vs Forearm Picking: Which Movement Should You Use?
A deeper look at where the picking motion should come from and when forearm movement becomes excessive.
How Deep Should the Pick Go Between the Strings?
Learn how pick depth affects resistance, tone, speed, and string crossing.
Why Your Hands Lose Synchronization at Higher Speeds
Learn why both hands fall out of sync and how to improve timing and coordination.
Final Thoughts
Your picking hand position should not be something you force yourself to hold. It should be a stable starting point that allows the movement to happen freely.
When you increase the tempo, pay attention to whether that position begins to change. A tightening grip, rising shoulder, locked wrist, deeper pick contact, or increased bridge pressure often appears before the notes actually start falling apart.
The goal is not to make the hand look perfectly still. The goal is to make the movement predictable and repeatable.
Build stability without pressure. Build control without rigidity. Let speed develop from a position that already works.
Personal Guitar Technique Analysis
A problem that feels like a lack of speed may actually come from palm position, wrist angle, pick depth, forearm movement, grip pressure, or the way your hand changes position at higher tempos.
During a personal Guitar Technique Analysis, I examine your playing, identify the main technical limitations, and prepare specific corrections and exercises based on your current level.
Record a short video with both hands clearly visible and send it for a detailed personal breakdown.
Support My Work
Not looking for personal feedback? If my guitar lessons, articles, and free resources have helped you, you can support my work and help me create more free guitar content.